
Cybersecurity Foundations Series-Lesson 7: Communicating Vulnerability Information
Finding the problem is important. Explaining it clearly is what gets it fixed.

Welcome back Everyone,
Up to this point, we’ve spent a lot of time learning how to spot risks, scan systems, analyze vulnerabilities, and understand what attackers might do. That’s all important. But Lesson 7 introduces a skill that often gets overlooked by beginners:
Communication.
And not the fluffy kind.
Not “good teamwork” on a poster.
I mean the real cybersecurity kind of communication where you can look at a vulnerability, understand the risk, and then explain it in a way that actually helps people make decisions.
Because in the real world, it’s not enough to say:
“Hey, I found some vulnerabilities.”
You also need to explain:
what the issue is
how serious it is
what systems are affected
what should happen next
and what might stop the fix from happening right away
That is the heart of Lesson 7: Communicating Vulnerability Information. The lesson focuses on vulnerability reporting, reporting best practices, KPIs, action plans, and inhibitors to remediation.
Why this lesson matters
Let’s make it real.
Imagine you run a vulnerability scan and it finds:
5 critical vulnerabilities
11 high vulnerabilities
40 medium vulnerabilities
Now imagine you send that raw output to your boss, the IT manager, and the system admins with no explanation.
What happens?
Usually one of three things:
they get confused
they ignore it
or they waste time trying to figure out what matters first
That’s why vulnerability reporting exists. Its purpose is to make sure the organization understands the risks in its IT infrastructure and the appropriate mitigations. The lesson also says reports can be simple summaries or more detailed reports with specific mitigations.
So this lesson is really teaching you how to move from:
“I found a problem.”
to:
“Here’s what the problem means, and here’s what we should do next.”
What is vulnerability reporting?
Vulnerability reporting is the process of taking security findings and turning them into something people can understand and act on.
CompTIA-style idea
It helps the organization become aware of weaknesses, improve response, strengthen security posture, and support compliance efforts.
So think of vulnerability reporting like this:
A vulnerability scanner is like a metal detector on the beach.
It can tell you that something is there.
But a report is the person who says:
here’s what we found
here’s where it is
here’s how dangerous it is
and here’s what we should do about it
Without that second part, the scan is just noise.
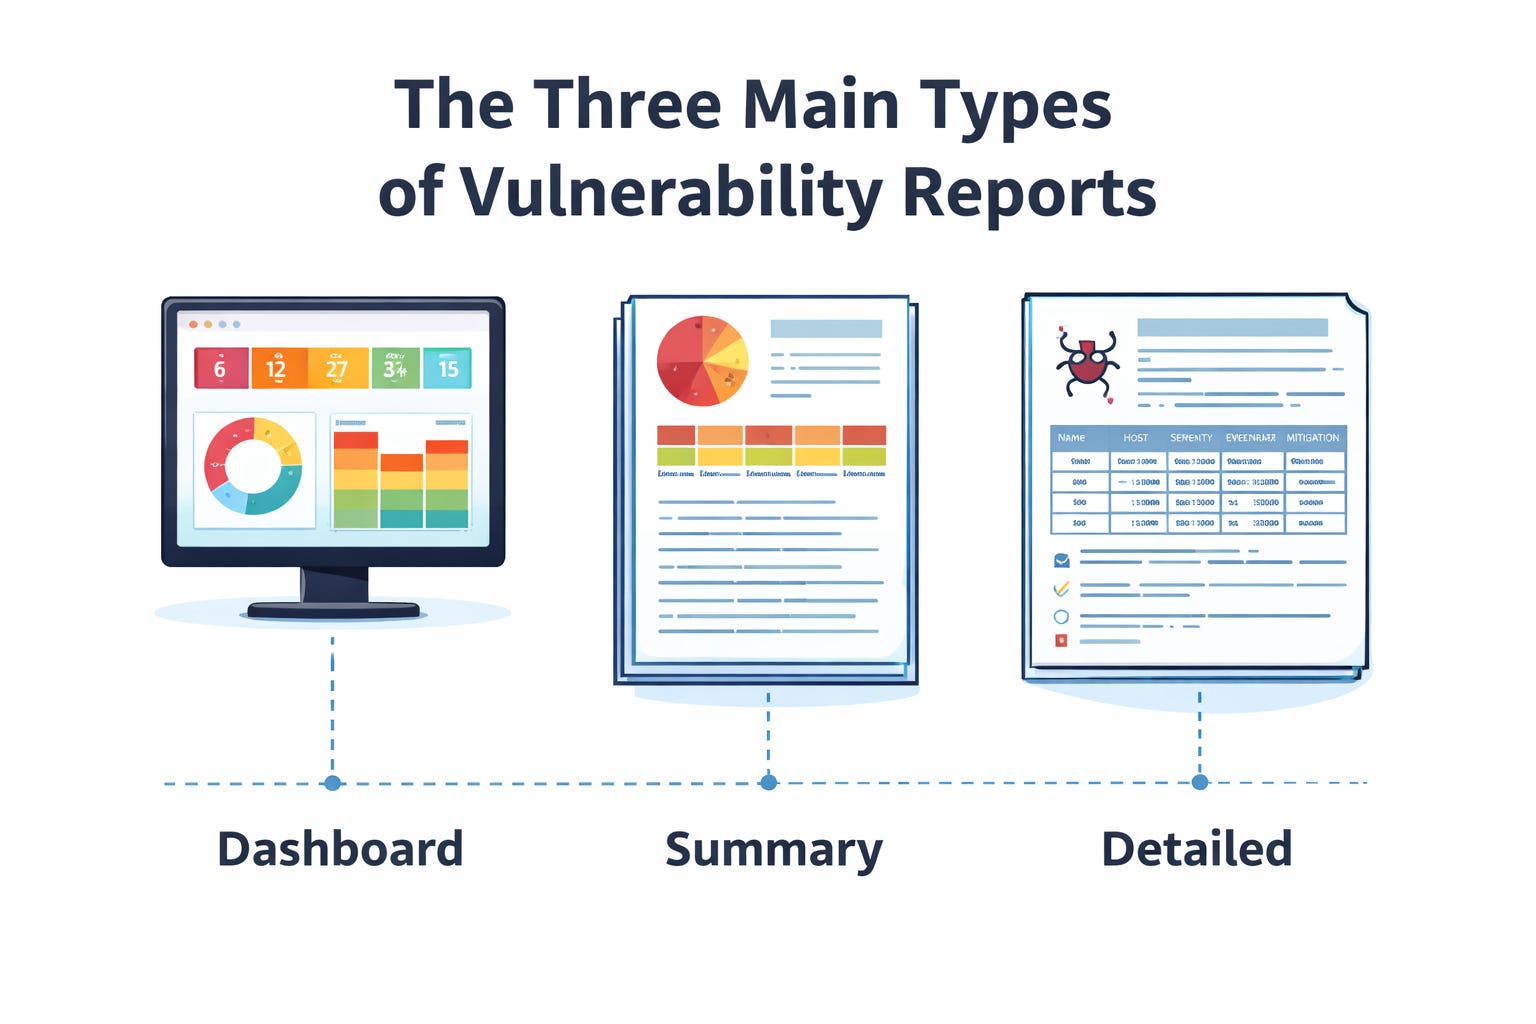
Lesson 7 points out three common report types: a vulnerability management dashboard, a vulnerability summary report, and a detailed vulnerability report.
1. Dashboard
This is the quick-glance version.
It might show:
how many critical findings exist
whether vulnerabilities are trending up or down
which systems keep showing up the most
what needs attention right now
This is good for managers, team leads, and anyone who needs fast visibility.
Think about it like this:
If your network had a “check engine” screen, the dashboard is that screen.
2. Summary report
This gives the big picture.
It usually answers:
What did we scan?
What did we find?
What is the overall risk?
What should we prioritize?
This is useful when leadership wants the story without having to read every technical detail.
3. Detailed report
This is for the people who actually have to fix the issue.
Lesson 7 says report content can include vulnerabilities involving operating systems, hypervisors, databases, desktop apps, mobile devices, web platforms, network devices, and more. It can also include audit findings, third-party assessments, physical security risks, and manual endpoint evaluations by analysts.
That means a detailed report is where the real technical work lives.
This is where you’ll likely see:
the vulnerability name
the affected host
severity
evidence
recommendations
mitigation details
So if the dashboard is the movie trailer, the detailed report is the full director’s cut.
Quick check-in
If you’re brand new to this stuff, here’s the simplest way to remember it:
Dashboard = quick view
Summary = big picture
Detailed report = fix-it view
That one idea alone can help you answer exam questions and understand real-world workflows better.
What should a good vulnerability report include?
Lesson 7 says a good report should contain:
details about the type of vulnerability
the number of instances
the affected systems
the risk levels
recommendations
That’s actually a great checklist.
Here’s the beginner-friendly version:
A good report should answer:
What is wrong?
Where is it?
How bad is it?
How many systems are affected?
What should we do next?
If a report doesn’t help answer those questions, it’s probably not very helpful.
And that matters because cybersecurity isn’t just about being technically correct.
It’s about being useful.
Best practices: how to make reports actually helpful
Lesson 7 doesn’t just say “make a report.” It also talks about doing reporting the right way.
It says to:
use appropriate tools
identify reporting needs first
select tools based on those needs
be consistent
create policies and procedures
generate reports on a regular schedule
It also says consistency matters in format, color-coding, critical information focus, and automation.
Why consistency matters
Imagine one report uses red for “critical,” another uses orange, and another uses no color at all.
Now people are wasting brainpower just trying to read the report instead of fixing the problem.
Consistency helps teams move faster.
Why automation matters
Automation makes reporting more reliable and easier to maintain.
That means fewer manual mistakes and less time copying data around.
And if you remember from Lesson 4, automation, SIEMs, SOAR tools, and repeatable processes were a huge part of improving security operations. Lesson 4 emphasized that automation makes operations more efficient, consistent, reliable, and cost-effective.
So Lesson 7 kind of answers the question:
“Okay, after all that automation and scanning… how do we present the results?”
Report formats matter too
Lesson 7 points out that vulnerability reports can come in different formats:
plain text
CSV and XML
HTML
PDF
That may sound small, but it matters.
Plain text
Great for command line use and searching.
CSV or XML
Useful for importing and exporting data between tools.
HTML
Better visual presentation in a browser.
PDF
Easy to print, share, and hand off formally.
Simple way to think about it
Different formats exist because different people consume information differently.
Analysts may love raw text.
Managers may want a clean PDF.
Tools may need XML or CSV.
Same information. Different delivery.
Risk score and priority: not every finding is equal
Lesson 7 explains that risk scores help measure risk levels, prioritize work, evaluate security posture, and even compare posture across organizations in the same sector.
This connects directly to Lesson 6.
In Lesson 6, we learned about CVSS, vulnerability validation, contextual scoring, and the fact that a vulnerability score is not always the whole story. CVSS helps prioritize remediation, but context such as patch availability, asset value, exploitability, and environment can affect the true priority.
So now in Lesson 7, we’re taking that scoring knowledge and asking:
How do we communicate the priority clearly?
Because a vulnerability may be “high” on paper, but maybe it is:
on an internet-facing server
on a sensitive system
tied to critical business operations
easy to exploit
That changes how fast it needs attention.
Real-world example
A critical vulnerability on a public web server should probably be handled faster than the same vulnerability on a lab system with no outside access.
Same technical weakness.
Very different business urgency.
That’s why CySA+ pushes you to think beyond the number and focus on the context.
Mitigations: what do we do about the vulnerability?
Lesson 7 says mitigation often includes identifying a required patch or describing a workaround, whether permanent or temporary.
This part matters because a report should not stop at:
“Here is the bad thing.”
It should also say:
“Here is the next step.”
That next step might be:
install a patch
change a configuration
block a port
segment the network
disable a risky feature
use a compensating control until a patch is ready
Interactive thought
If you found a critical flaw in a server that cannot be patched until next week, what would you do today?
That’s the kind of thinking this lesson wants from you.
You might:
restrict access
monitor it more closely
isolate it
add firewall rules
document the risk and track it
That is analyst thinking.
Top 10 lists: why trends matter
Lesson 7 also talks about Top 10 lists and says they help highlight potential problems and focus on important activities, trends, or environmental changes. It gives examples like:
vulnerabilities by host
vulnerabilities by count
traffic volume by device
protocols by volume
top external IP connections
email volume by user
malware alerts by user
This is such a practical concept.
Because sometimes the smartest question in cybersecurity is not:
“What happened once?”
It’s:
“What keeps showing up over and over again?”
If one host always appears in the Top 10, that matters.
If one user keeps triggering malware alerts, that matters.
If one protocol suddenly spikes in volume, that matters.
Patterns tell stories.
This also ties back to Lesson 2, where we explored threat intelligence, threat hunting, and indicators of compromise. Lesson 2 taught that threat hunting uses an “assume breach” mindset and relies on indicators of compromise from logs, monitoring tools, endpoint tools, and SIEM platforms.
So Lesson 7 is really showing how findings and trends get packaged into something useful.
Compliance reporting is part of this too
Lesson 7 says regulatory compliance reports may include policies, procedures, audit results, employee training records, and risk assessments, while internal compliance reports may include endpoint patching, configuration, procedure adherence, vendor practices, change management, and user account management.
This ties strongly into Lesson 5, where we talked about standards and frameworks like NIST, ISO, CIS Benchmarks, OWASP, PCI DSS, and privacy regulations.
So vulnerability reporting is not just for internal security teams.
Sometimes it also supports:
audits
legal requirements
regulatory expectations
industry standards
That means reporting is not optional busywork.
Sometimes it is part of keeping the organization compliant and accountable.
KPI: how do we know if security is improving?
Lesson 7 introduces Key Performance Indicators, or KPIs. It says KPIs help measure progress toward goals, identify areas for improvement, and measure the effectiveness of a cybersecurity program.
KPIs are basically the scoreboard.
They help answer:
Are we improving?
Are we detecting faster?
Are we reducing risk?
Are we putting resources in the right place?
Lesson 7 gives examples such as:
incidents tracked over time
detection time
indicators of compromise
number of threats
risk assessment results
resource allocation
Beginner example
Let’s say last quarter your team had:
20 critical findings open for 30+ days
slow detection times
repeated malware hits on the same systems
And this quarter:
open critical findings are down
detection time improved
repeated issues decreased
That suggests the security program is getting stronger.
KPIs turn “I think we are doing better” into “the data suggests we are doing better.”
But KPI data can be tricky
Lesson 7 also warns that KPIs are not perfect. It says incidents can be subjective, false positives happen, the cybersecurity landscape data may be inaccurate, irrelevant data can get in the way, and KPI-based decision-making is complicated.
This is super important for beginners.
Because numbers can lie if you don’t understand them.
For example:
more alerts might mean things are worse
or it could mean your visibility improved
or your SIEM got tuned better
or your team is finally catching what used to be missed
So KPI thinking is not just about staring at a graph.
It’s about asking:
What does this trend really mean?
Action plans: the bridge between finding and fixing
Now we hit one of the most practical parts of the lesson.
Lesson 7 says action plans provide direction and focus, help meet strategic goals, frame progress, outline steps, resources, and timelines, and should be tailored to the organization and updated as the environment changes.
Simple definition
An action plan is the “now what?” document.
Not just:
“These vulnerabilities exist.”
But:
“Here is how we’re going to deal with them.”
The lesson lists common action plan outcomes such as:
establishing security policies
training staff
software patching
compensating controls
configuration management
That means action plans turn findings into movement.
Quick example
If the issue is users clicking phishing links, the action plan might include:
awareness training
email filtering improvements
MFA rollout
If the issue is outdated systems, the action plan might include:
patching schedule
maintenance window planning
asset replacement timeline
This is why cybersecurity is not just detection.
It is also follow-through.
Why remediation gets delayed in the real world
This part is big because it teaches realism.
Lesson 7 explains that remediation can be slowed down by:
MoUs
SLAs
governance
costs
operational pressure
stakeholder conflicts
business process interruption
degraded functionality
legacy systems
proprietary systems
If you are new to cybersecurity, this can feel frustrating at first.
You might think:
“If the vulnerability is bad, why not just fix it immediately?”
Because the real world is messy.
Maybe patching breaks a critical business app.
Maybe a legacy system cannot handle modern updates.
Maybe a vendor controls the software.
Maybe downtime would cost a ton of money.
Maybe leadership is balancing risk against operations.
That does not mean security is being ignored.
It means cybersecurity has to work inside business reality.
And honestly, that’s one of the biggest differences between textbook security and real-world security.
A quick beginner scenario
Let’s say you are a junior analyst and you find an old server with a serious vulnerability.
Your first thought might be:
“Patch it now.”
But then you learn:
it supports payroll
it only works with an old application
the vendor no longer supports it
replacing it takes months
Now the answer changes.
Maybe the real action plan is:
restrict access
segment the system
monitor it closely
document the exception
build a replacement plan
That’s still security work.
It’s just smarter and more realistic security work.
How Lesson 7 connects to the first 6 lessons
This is where everything starts coming together.
Lesson 1: Governance, risk, controls, patching
Lesson 1 taught us the importance of governance, risk responses, control types, attack surface reduction, patching, configuration management, and maintenance windows.
Lesson 7 builds on that by showing how we communicate risk, report findings, recommend mitigations, and explain why a control or patch matters.
Lesson 2: Threat actors, threat intel, IoCs, threat hunting
Lesson 2 introduced threat actors, OSINT, threat intelligence sharing, IoCs, and threat hunting.
Lesson 7 connects because once you find suspicious activity or patterns, someone has to write it up prioritize it and communicate it clearly.
Lesson 3: Systems, IAM, logging, visibility
Lesson 3 taught us about system hardening, zero trust, IAM, DLP, PKI, and centralized logging.
Lesson 7 uses the data from those systems and logs to produce dashboards, reports, and measurable security outcomes.
Lesson 4: Security operations and automation
Lesson 4 focused on automation, SIEM, SOAR, enrichment, orchestration, and process consistency.
Lesson 7 is where the outputs of those tools become understandable reports, trends, KPIs, and action plans.
Lesson 5: Vulnerability scanning
Lesson 5 taught us how scanning works, the difference between internal and external scans, credentialed and noncredentialed scans, passive and active methods, baselines, and compliance scans.
Lesson 7 is basically what happens after the scan: now you need to explain the results in a way that leads to decisions.
Lesson 6: Vulnerability analysis and scoring
Lesson 6 taught us about CVSS, SCAP, validation, false positives, true positives, exploitability, and context.
Lesson 7 takes that analysis and turns it into business-facing communication: what matters, what comes first, and what the plan should be.
Final takeaway
If Lessons 1 through 6 taught us how to find, understand, and prioritize security issues, then Lesson 7 teaches us how to communicate those issues so they can actually be addressed.
And that’s a real cybersecurity skill.
Because the best analysts are not just the ones who find the most problems.
They are the ones who can say:
here’s the issue
here’s why it matters
here’s how urgent it is
here’s what we should do
and here’s what might get in the way
That is how you help make an organization safer.
That wraps up Lesson 7.
We covered vulnerability reporting, report types, best practices, KPIs, action plans, and the very real reasons remediation can get delayed. More importantly, we saw how this lesson connects back to the first six lessons and helps pull everything together into one bigger cybersecurity picture.
Thanks for learning with me, and I’ll see you next time as we keep building these cybersecurity foundations one lesson at a time.